.jpeg)
This blog post is a summary of a Skimmer webinar hosted by Niki Acosta, Jazmin Medrano, and Sarah Ranft Doody from Skimmer in August 2024. Click here to watch the full webinar on demand.
At Skimmer, we’re on a mission to empower pool service owners to build great businesses. But to build something great, you need the right tools—and the expertise to know how to use them.
The 27,000+ pool service professionals who use Skimmer to service over 700,000 pools have those tools. But what about the ones who don’t? During a recent webinar, our three hosts aimed to help out those pool service owners by providing a high-level overview of how Skimmer can help them build great businesses.
This article summarizes the webinar. It provides information on many of Skimmer’s best and most-used features, from the back-office web app features that put data at owners’ fingertips to the app technicians use in the field to the billing solution that makes invoicing a breeze. We’ll also touch on the free educational resources Skimmer provides pool service owners to help them build the best business possible.

How to use this blog
This blog provides a very in-depth look into the Skimmer product. We recommend using it as a reference that you can revisit to learn more about the solution and how it can specifically help your business. Here’s a breakdown of what we cover:
- SKIMMER’S BACK OFFICE FEATURES (WEB APP)
- Customers
- Service rates
- Customer profiles
- Photos
- Pools
- Route Builder
- Route optimizer
- Route Dashboard
- Work Orders
- Broadcast Emails
- Reports
- Invoicing report
- Profit report
- Chemical dosages report
- Customers
- SKIMMER’S TECHNICIAN FEATURES (THE MOBILE APP)
- Mobile app features for administrators
- Mobile app features for technicians
- Route stop features
- SKIMMER BILLING
- How to generate invoices
- Auto invoicing
- MORE SKIMMER RESOURCES TO HELP YOU SUCCEED
- The Skimmer Resource Library
- The Pooldeck
- Our Award-winning support team
But first: What does Skimmer do?
In a nutshell, Skimmer streamlines all workflows between the office, the field, and customers. It does this by providing:
- A data-rich service record that’s stored in the cloud and available to owners and admins at any time.
- Real-time reporting that tracks chemical usage, work orders, spending, service, and pricing to help you make better decisions.
- An automated billing tool that makes end-of-the-month (or anytime) invoicing a breeze.
If you’d like a really quick overview of the Skimmer platform, check out the video below.
By using Skimmer, pool service owners can:
- Manage routes and repairs painlessly
- Hold technicians accountable
- Prevent tasks and profit from falling through the cracks
- Find and fix profit leaks, customer by customer
- Bill clients easily and get paid on time every month
- Implement a software that’s intuitive and saves everyone time
Let’s take a look at Skimmer’s back office features first.
Skimmer’s back office features (the web app)
Skimmer’s web app is for pool service owners and admins—the people who run scheduling, billing, and customer care. Its features are designed to make each part of this process intuitive and error-proof. Let’s look at each one in detail.
Customers
Within the “Customers” tab in the web app, you can set or adjust service rates, view and edit customer profiles, add notes on service locations, and more. Let’s take a look at each feature in detail.
Service rates
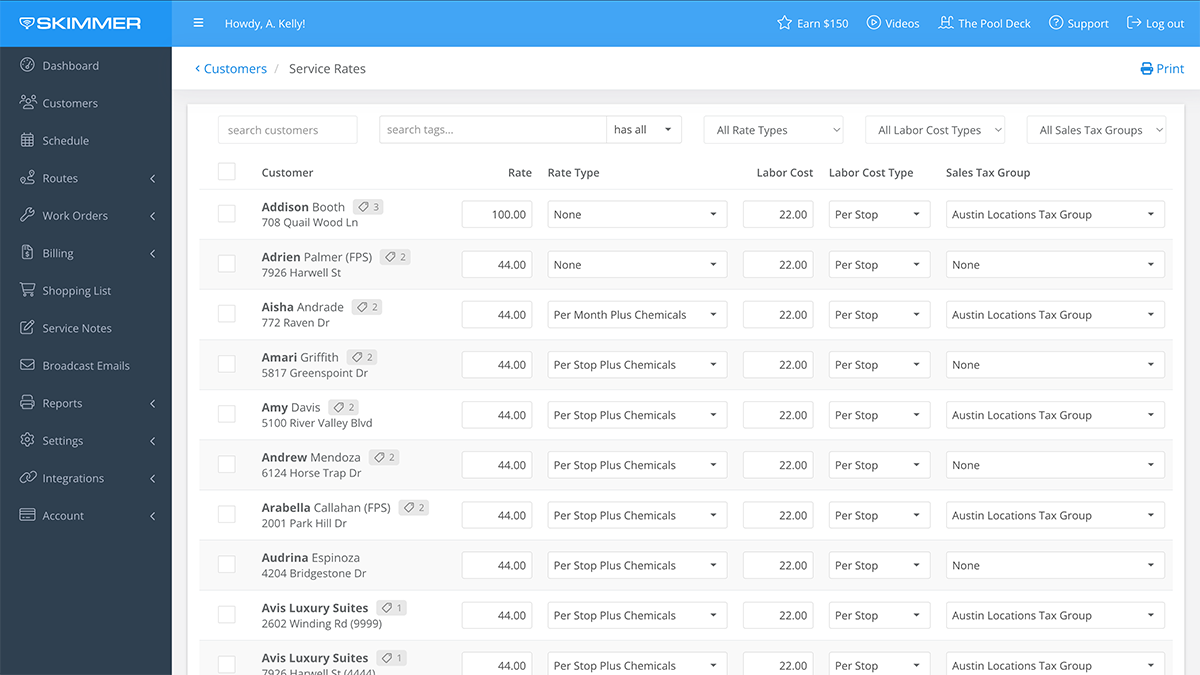
In this section, you can bulk update all the rates you’ve set for your customers.
When you click into this screen, you’ll see each of your customers, their rate, their rate type, labor cost, labor cost type, and sales tax group.
This is where you can bulk update rates and rate types. For rate types, you can choose between:
- Per stop plus chems
- Per stop with chems
- Per month plus chems
- Per month with chems
If you have different customers with different rate types, you can also manually change rates per customer within this tab. You can also bulk update labor costs, whether you charge them per stop or per month.
Customer profiles
You can click on any customer’s name to see their profile, photos, and bodies of water. If one location has multiple bodies of water, you can access them all within the same customer profile.

You can do a lot in a customer profile–beyond updating basic information like the customer address, there are a couple of important edits you can make here.
One is adding customer codes, which show up in parentheses under a customer name when your technicians view a customer in the app. You can make important notes for your techs here, like “Chems only, no clean,” “Text before you arrive,” or “Has an aggressive dog.”
You can also add tags in this section, which is one of Skimmer’s best and most underutilized features. Tags allow you to segment your customer base and view your business holistically.
Tags are completely customizable, so you can add them based on information like how a customer found you (Facebook, customer referral, etc.), the type of customer (seasonal vs. weekly), or specific pieces of equipment you want to filter for, like “does their own filter clean.” You can even add a tag for the year a customer started their service with you and use that as a filter when you run reports (more on that later).
Service location
The “Edit Service Location” section is where you can make customizations that make your technicians’ lives easier. There are fields here for things like gate codes or the customer’s dog’s name, the customer’s rate and rate type, their labor cost, and labor cost type.
Can also add any notes you’d like your technicians to see to this section, like further instructions that you don’t want them to miss.
Photos
You can add any photos of the customer’s site to this section, such as pictures of the pool, a picture of how the gate opens, or pictures of specific equipment. You can also add captions to each picture so that everyone knows what they’re looking at.
This feature is not only handy for technicians—if a customer calls in and asks a question about their equipment, you can look at the photos saved here instead of having to send someone out for a site visit, saving everyone time and money.
Pools
This tab allows you to view and add details for every body of water under a specific customer profile. In addition to basic information like gallons and baseline filter pressure, you can add any notes you’d like your technicians to see.
You can also add the specific equipment types that each pool has, along with any notes like warranty info, install dates, and instructions for servicing specific pieces of equipment.
Items needed
If you have particular pieces of equipment, parts, or chemicals that you’re using for a pool, you can add any of these to the “Items Needed” list, along with the price you’ll charge for it. For example, if a customer needs a new floater, you can select it, add the quantity, and save it at the correct price.
When your technician is at that location next, they’ll see a pop-up reminding them to add or include that item. This item will also show up on that customer’s monthly invoice, along with the date it was installed or serviced.
Service checklist
There’s a generic checklist you can access for each pool. But of course, every customer is different, so you can also easily customize this checklist on a customer-by-customer basis as needed.
For example, if you need to add in a step for the technician to lock the gate at the end of each visit, you would add it here. You can also add a requirement that the technician has to take a photo of the completed step in order to close out the stop for that pool.
Route Builder
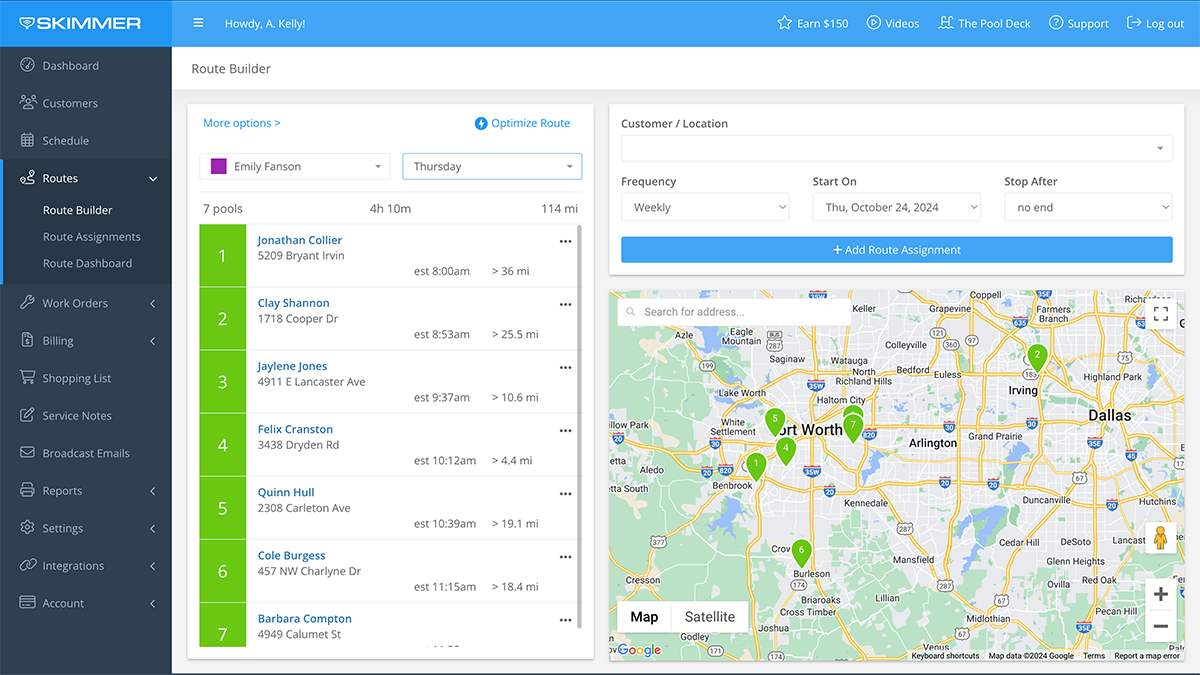
This feature offers a super quick, easy, and efficient way to get your routes on schedule.
You can start using this feature by selecting the technician and day of the week you want to build a route for. Once you click “Optimize Route,” it will populate all the pools that tech will service in a day, both in a list view and a map view.
With this feature, you can also:
- Add new customers or locations to any route and specify their frequency.
- Add “Start on” and “Stop” dates for seasonal customers.
Route optimizer
Once you have each route stop detail sorted, you can click “Optimize Route” above the list of stops. From here, you can select your start and end locations for the route you’d like to optimize.
Your start location can either be a route stop or a customized address. For example, if your techs usually start from an office or supply store, you can select “Company Address” and add it here.
Once you have your start and end locations, Skimmer will optimize your route. You can also drag and drop from there to customize it further.
Route Dashboard
This is a screen within the “Routes” section that gives an overview of all your techs, including where they are at any given time during the day or week. Here, you can see which pools your techs are servicing and how long each tech spends at each route stop.
Click into the “Info” button for any route stop and see what time your tech was there, all of the readings and dosages that came out of that visit, which checklist items were completed, and any emails that were sent. If a customer calls and wants to know what was done today, you can quickly refer to this screen and tell them everything they need to know.
You can also make last-minute changes to your techs’ daily workflows from this screen. For example, if one of your technicians calls out sick for the day, you can click the three dots on that tech’s card and move their stops to another day, another tech, or both. This can be a one-time or permanent move.
You can also select “Email Customers” to alert your sick technician’s customers that a different tech will be visiting their pool today. This is pre-segmented for you, meaning if you select this from the Route Dashboard screen, it will pre-populate with your tech and the relevant date so that you’re only emailing affected customers for that technician and that day.
Work Orders
You can add work orders directly to your customers' profiles for any one-off jobs that pop up. This is a great feature for repairs, filter cleans, openings, or closings.
You can add work orders from a couple of different places in the web app:
- The Route Dashboard
- The Customer Profile
- The Work Order section in the left nav of the web app
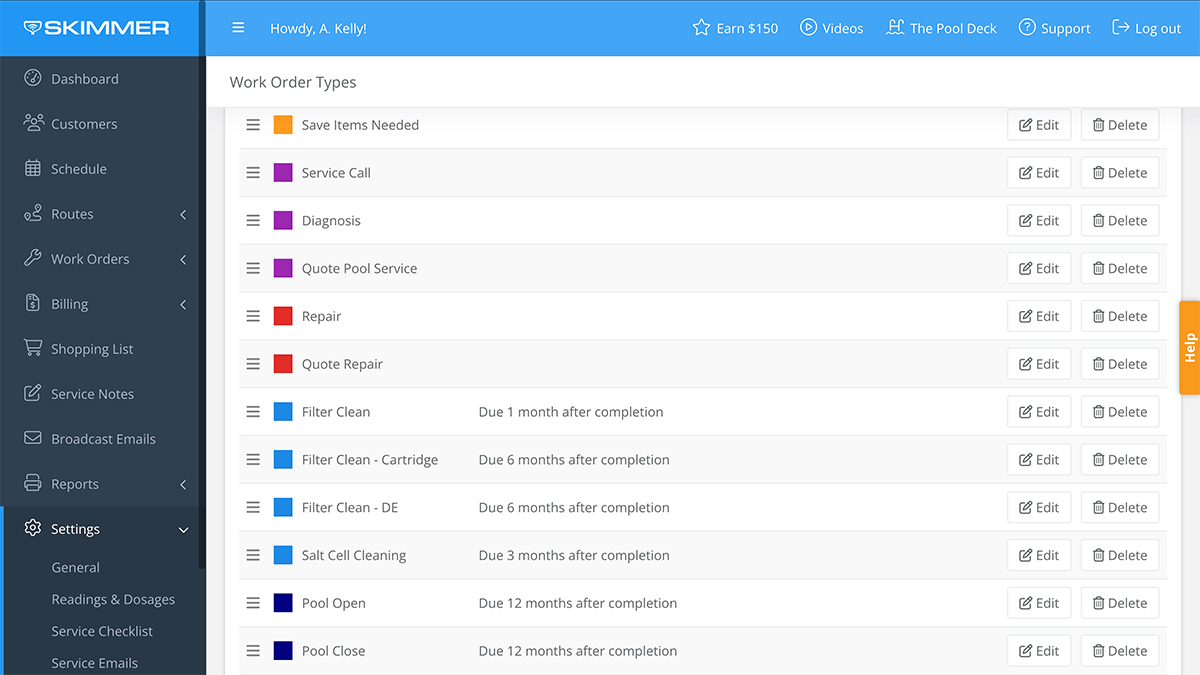
Once you select “Add Work Order,” you can select the Work Order Type from a list. The items in this list are completely customizable, so you can add and adjust them yourself according to what makes the most sense for your business.
Once you’ve selected the Work Order Type, select the Customer/Location and add any notes about what’s needed. From there, you can assign it to the appropriate technician, select a service date, and add it to the schedule.
Within the Route Dashboard, Work Orders appear with their Work Order Type tag so that techs can see that it’s above and beyond a regular stop.
If you want to create a recurring Work Order (like for annual pool openings and closings or filter cleans), you can set any Work Order to be recurring. Once you set that parameter, you’ll see it come up in your “Upcoming Work Orders” screen.
Broadcast Emails
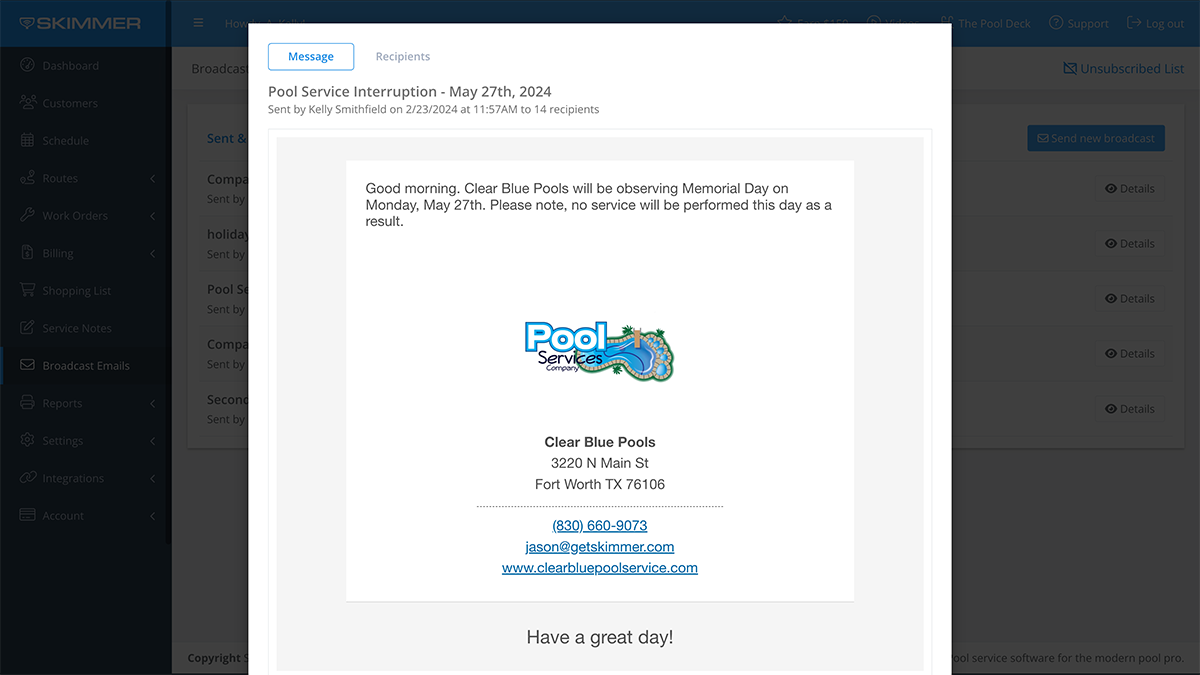
If you need to email your customers, whether it’s with a marketing message or a scheduling alert, you can do so from Skimmer’s web app.
How you do this is up to you. You can select “Broadcast Emails” from the left nav, or you can click the three dots next to any customer’s name in your Route Dashboard and select “Email Customers” from there.
You can also email people with a certain tag, like seasonal customers. For holidays, you can select all customers that would have been serviced during that day and email them to let them know about the schedule change.
Reports
You can access a number of reports from the “Reports” button in your left nav. Here are three key reports that can give you essential insights into your company’s operations.
Invoicing report
At the top left of this report screen, you can choose any of the last three months to report on. On the right, you can select any custom dates outside of those months.
This report is segmented by customer. It shows the number of stops, work orders, dosages, installed items, and the total to be invoiced for that time period.
When you click into a customer from this report, it will show you the dates you were there, the chemicals you used, and any installed items, along with the dates they were installed.
Profit report
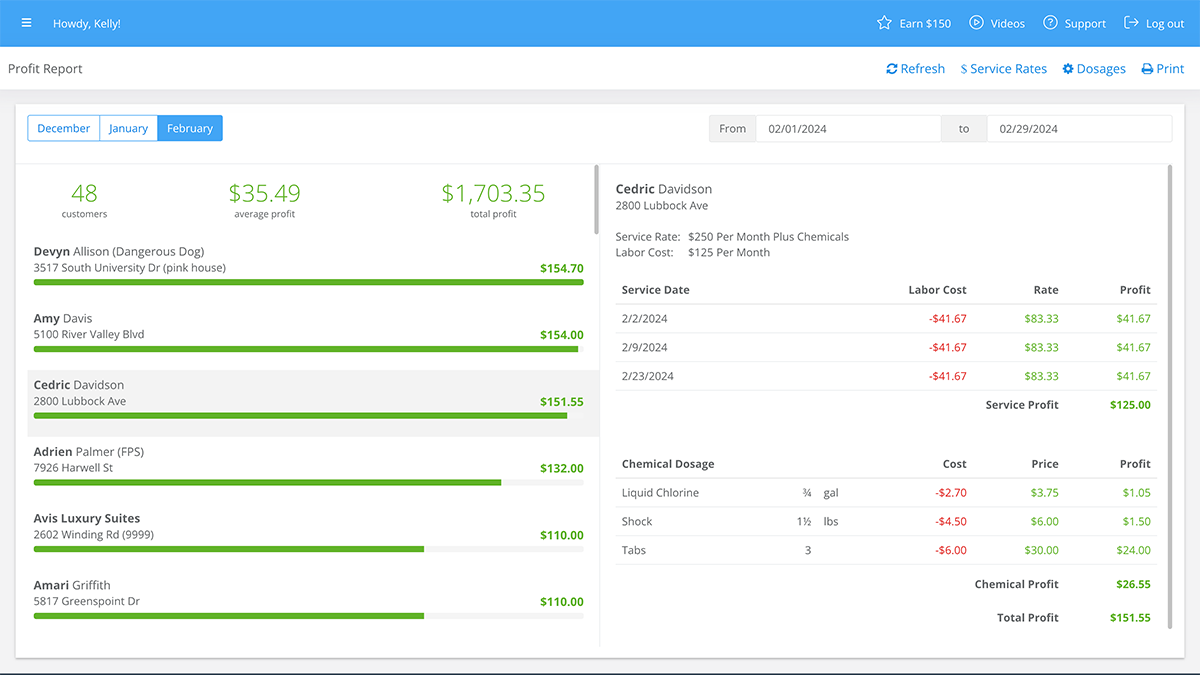
Like the invoicing report, you can view profit information for any of the last three months or select a custom date range.
This report is also broken down by customer. You can click into any customer and see their labor cost, rate, and the profit you’re making from them.
You can use the findings from this report to make adjustments that affect your profitability. For example, if your labor cost is higher than the rate for any given customer, that may be a signal that you need to have a pricing conversation with that customer and adjust their rate.
Chemical dosages report
This report is segmented by technician, and shows you the quantities of chemicals that each tech is using. This is a super helpful report because it allows you to compare across all technicians. If there are big variances between techs, you can find them quickly and coach your technicians that may be using more chems unnecessarily.
Skimmer’s technician features (the mobile app)
Skimmer’s mobile app puts customer information at your fingertips. It also allows your technicians to complete their daily tasks easily, with as much context and support as possible.
Mobile app features for administrators
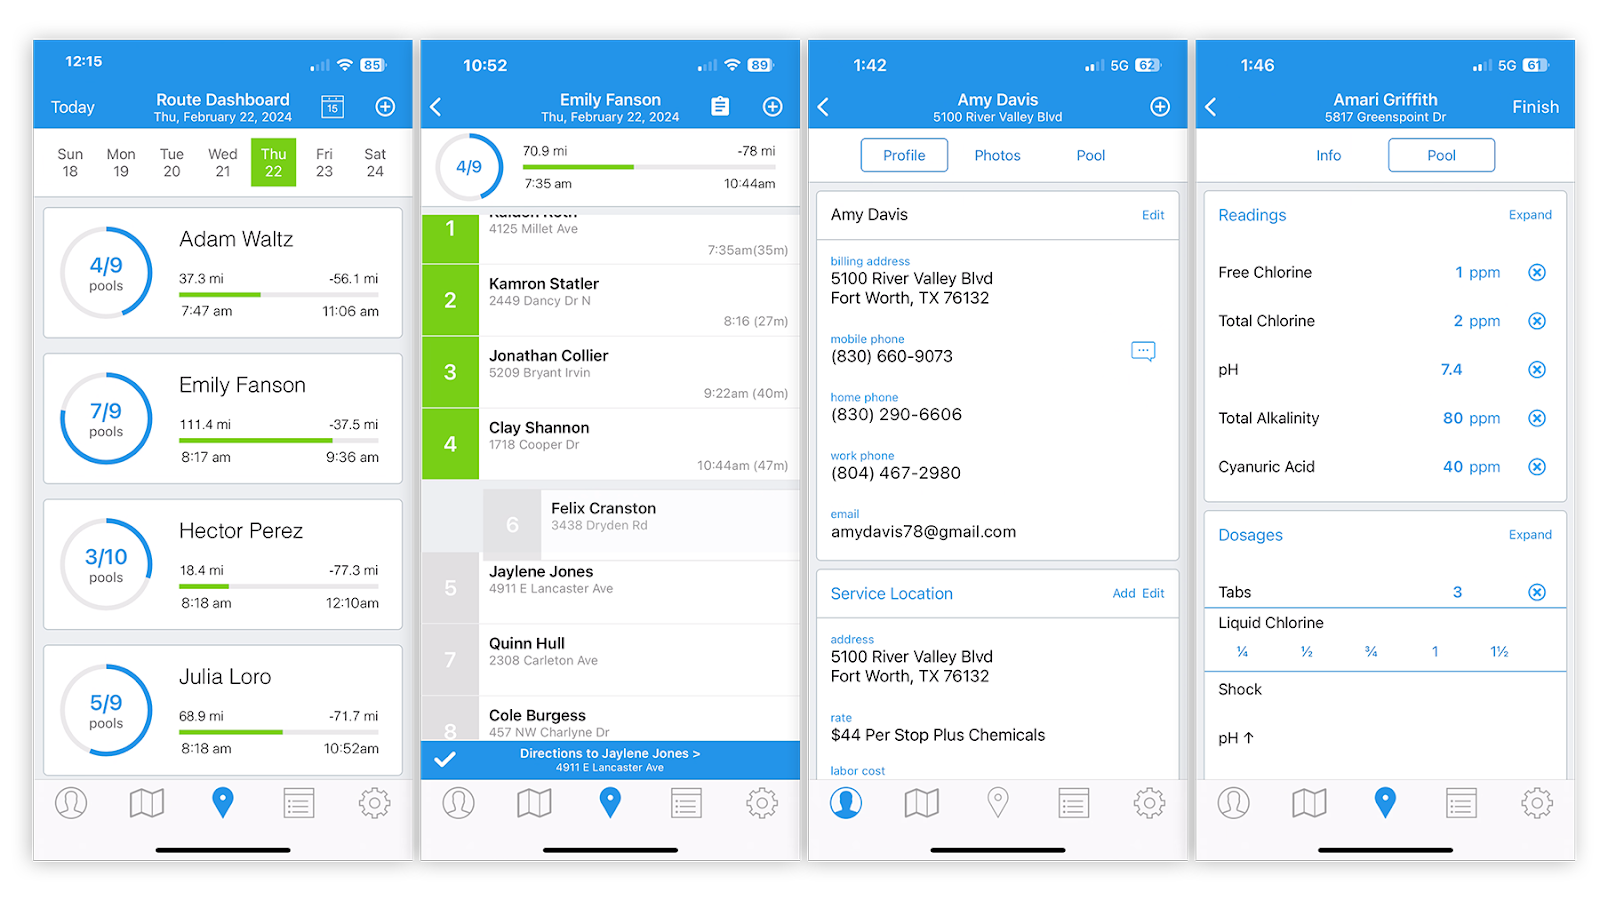
As an administrator, you can view your Route Dashboard from the mobile app any time to get a snapshot of how your techs are doing throughout the day.
Customer information
Clicking on the “person” icon on the lower left of the mobile app takes you directly to your customer list. Just like with the web app, you can add and edit information within each customer’s profile. You can also search for any customer in the search bar at the top.
When you tap into a customer, you’ll see all the same data points that you’d see on the web app: the customer’s profile, photos, and pools. If you need to edit any information, you can do so directly within the appropriate field.
Route and technician information
From the Route Dashboard (the pin in the middle of the screen), you can see a summary for each technician: how many stops each tech has completed, whether they’ve skipped any stops and their estimated end time for the day.
When you click into a technician’s name, you’ll see a list of items for the day. You’ll also see a checkmark and lightning bolt at the bottom of the screen. If you click the lightning bolt, it will take you to the Route Optimizer. From there, you can choose defaults or specific addresses to start and end from, just like in the web app.
Mobile app features for technicians
Route stop features
Completing tasks
To complete a route stop, your technician would tap that customer from their list of daily tasks. Once they select the customer, they’ll be able to see any recent activity, such as chemicals that have been tracked as well as any pool information.
In the “Info” tab for any customer, your technician can view any details you want them to be aware of, such as service location notes, photos of equipment, or contact information. (You can also choose to block out customer contact information for your technicians if you’d like to keep it confidential).
The “Pool” tab of a customer’s profile is where your tech will complete their work. Here, your tech can see any items they’ll need for the day, as well as checklist items they need to complete for that stop. If a checklist item is required, the icon beside that item appears as an asterisk (*).
You can also require your techs to take a photo for a specific checklist item to show that it’s been completed, like taking a picture of a closed gate. This feature requires the tech to take a live photo, so it’s not possible for techs to try to game the system by uploading a picture from their camera roll.
As your tech completes checklist items, they can swipe right on each item to mark it as finished. They can do this even if there’s no cell service where they are—in that case, all data is uploaded as soon as your tech reaches service again.
Readings and dosages
Your technicians can also input readings and dosages per customer for each visit. This section is also located in the “Pool” tab for each customer.
Once your tech inputs readings (such as water temp, pH, chlorine, etc.), they can click “calculate” to see the Orenda reading for that day. From the Orenda reading, your tech can click “Get Dosages” and select the dosage they want. Then it will automatically track that dosage for your tech.
Adding notes
Your tech can add any notes for you in the Notes section for any route stop. For example, if there’s a leaky pump, they can add that note and select “Alert the Office”, which automatically sends an email to the office.
Sending a service report
Customers love getting service reports once their weekly service is completed. To make this easy for your techs, you can pre-save messages that they can choose from, such as, “We left your pool in service mode.” Your tech will also be prompted to take a picture, which the customer receives with their service report.
Alerting customers that you’re on the way
When your tech selects “finish” on any given route stop, a box will pop up asking if they're on their way to the next stop. If they tap “on the way,” Skimmer will automatically send a text message to your next customer, letting them know that you’ll be there shortly.
Changing routes on the fly
If anything comes up during the day that would prevent your tech from completing their routes, they can make changes within the app that ensure service isn’t interrupted.
At the bottom of the Route screen, you’ll see a checkmark. Tapping this will bring up an option to “move selected customers”. This allows your tech to move their remaining stops directly from the app. They can select specific customers and move them to a different tech or a different day. You can do this as a one-time or permanent move.
Make invoicing a breeze with Skimmer Billing
Building out and sending invoices manually is one of the biggest pain points for pool service owners. Skimmer Billing is an effective cure. It pulls in Skimmer data to show what’s been tracked, which products were used, and what was installed for each customer each month. This is all populated into the invoice generator, which you can bulk-update and generate invoices for each month.
How to generate invoices
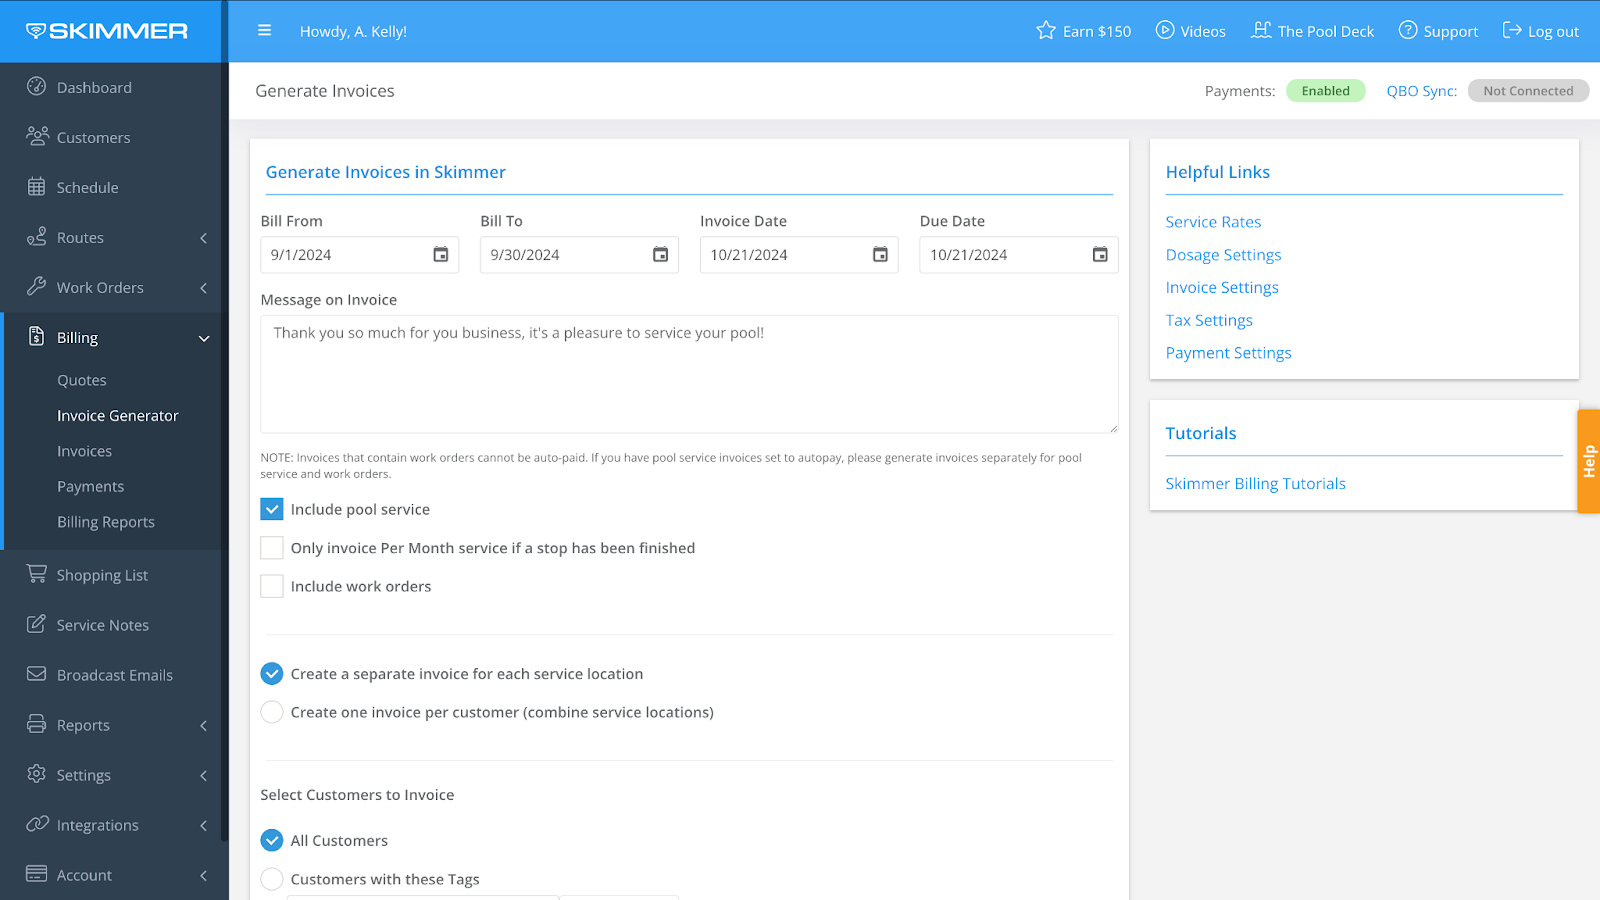
Within the Invoice Generator under “Billing”, you have a few options. After selecting your date ranges, you can select “Include Pool Service,” “Only Invoice Per-Month service if a stop has been finished,” or “Include work orders.”
From here, you can either select “All Customers,” Customers with these Tags,” or “Specific Customer.” Then you can click “Continue”, which takes you to the Pool Service tab. In this tab, you can view the service dates, unit price, chemicals used, and products charged for.
In the “Additional Items” tab, you can bulk add any extra services (this is also where you would bulk add a discount).
After this, you’ll see the Invoices Preview tab. This gives you a summary of the number of customers you’re sending an invoice to, the total amount you’re charging, and the applicable tax. From here, you can generate and send all invoices at once. If you don’t want to send them out just yet, you can simply click “generate” to send them all to draft.
Auto invoicing
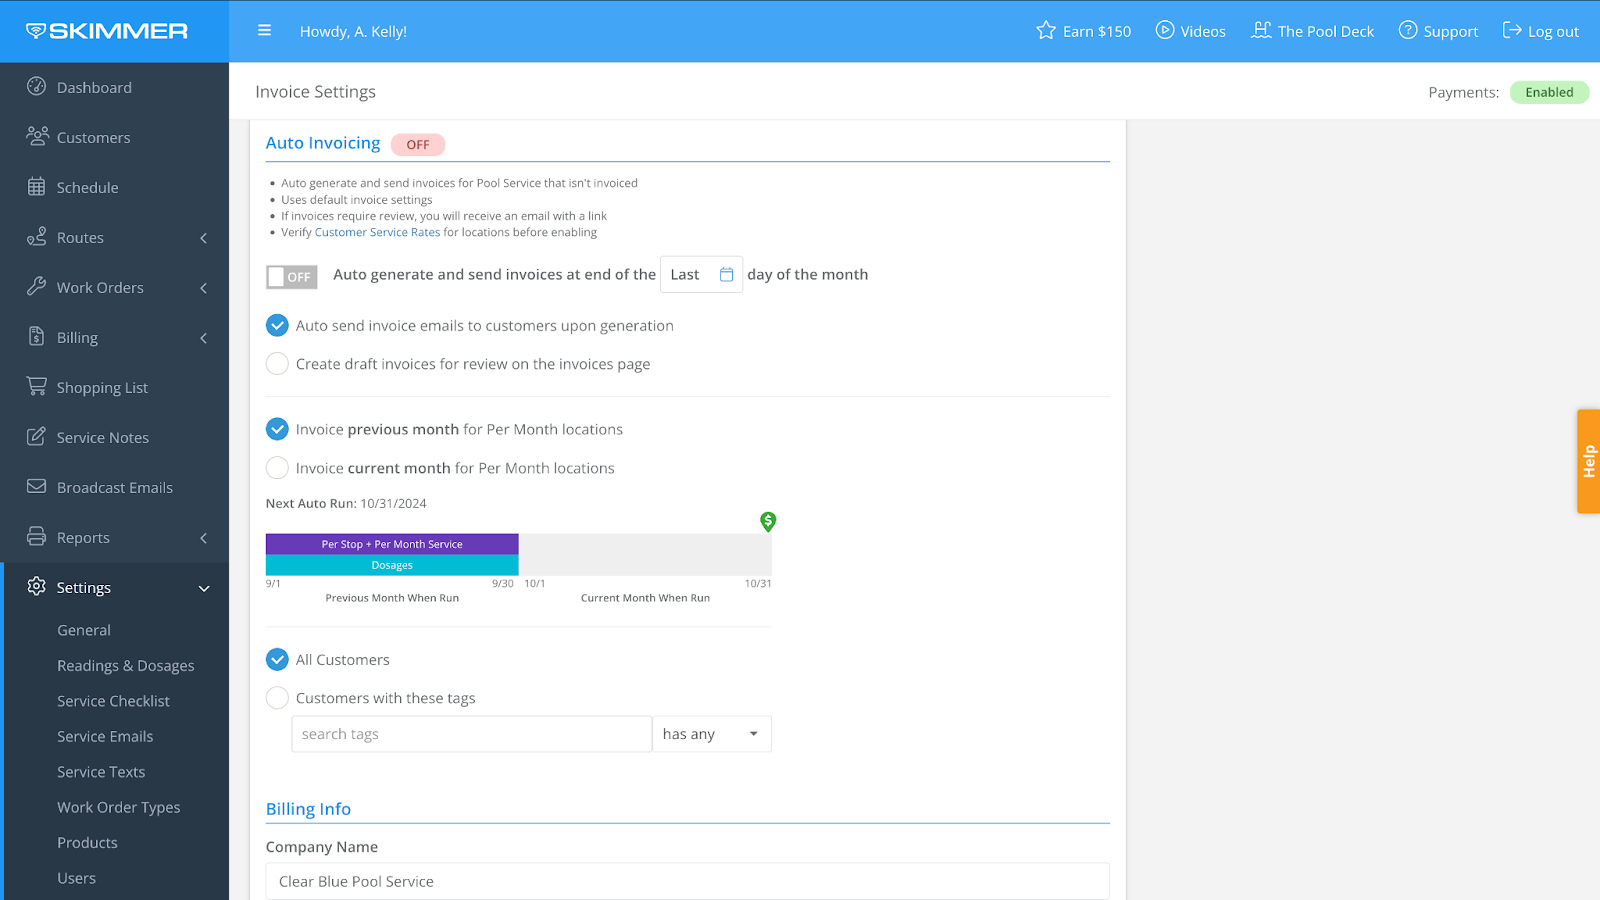
Under “Invoice Settings,” you can set up invoices that will generate on a specific day of the month. You’ve got a couple of options here:
- Auto-send invoices once they’re generated
- Save them in draft form to send later
- Send invoices for the current or previous month as a default
- Only send invoices for specific customer tags
Skimmer also connects to your QuickBooks account. When you invoice and collect payments in Skimmer, a record is automatically generated in QuickBooks, so you don’t need to enter information twice.
You can also enable auto-pay on a customer’s profile (after getting their permission!) or they can select auto-pay as an option from any invoice you send.
More Skimmer resources to help you succeed
The Skimmer Resource Library
Our resource library features all kinds of tools, guides, and templates to help you run your business well. In it, you’ll find resources on a number of subjects, like:
- A guide on how to raise your prices
- An ebook covering marketing 101 for pool pros
- A pricing index that surfaces service rates in your area
- A toolkit to help you prepare service agreements
And more! The best part of this library is that everything is free and available to anyone.

The Pool Deck
The Pool Deck is a community for pool pros that we launched in 2024. Our aim was to create a community helps pool service owners connect, brainstorm, share ideas and access expertise from other fields, such as accounting, bookkeeping and marketing.

Through the Pool Deck, we host workshops, hold contests, and allow you to connect with other people in your area or across the country. You can also find hacks, tips and tricks. The best part? You don’t have to be a Skimmer customer to join this community (you do have to own your own pool service company—this is a measure we put in place to prevent residential pool owners from taking advantage of the free advice).
Our award-winning support team
The Skimmer support team goes above and beyond to ensure our customers are happy. This starts with training: every employee is required to do ride-alongs with customers so that they know what the day-to-day work looks like. We also require our employees to go to pool school. That means if you have a question, we know exactly what you’re talking about.
Our support team offers:
Onboarding assistance when you join
- Quick-start guide in app that takes you through each step
- Comprehensive tutorial library with video and written instructions
- Customer import tool
- Live phone support, Monday to Friday, 8 am - 6pm CT
- Email support at support@getskimmer.com
Ongoing customer success
- Strategic guidance
- Quarterly business reviews
- Implementation planning
- Proactive problem resolution
- Best practice configuration
- Dedicated customer success manager
Build a better pool service business with Skimmer
At Skimmer, pool service owners are our top priority. If we can make it easier to build processes, manage technicians, and make a profit, we’re doing our jobs right. If you’d like to learn more about how Skimmer works, or sign up for a free trial, visit our website and click “Get Started”.


